RxAndroid and Kotlin (Part 1)
Ahmed Rizwan
RxAndroid and Kotlin (Part 1)
I started with RxAndroid about a week ago. At first, I didn’t really get it... I mean, I grasped the concept but I didn’t understand where I should be using it. But then after going through a few examples and a few really good articles (links at the end)... I just got it! (to a good extent) And my reaction was pretty much:

Such Rx. Much Reactive. Wow!
In short, you can use Rx almost everywhere — but you shouldn’t. You should intelligently figure out where it should go. Because in some instances, Rx can be a 100 times more productive and better than normal imperative programming, and in others, it just isn’t necessary.
I’ll demonstrate a few examples in both Kotlin and Java so that you get an idea of Rx as well as a comparison of the two languages.
Now if you’re not familiar with Kotlin, then I suggest that you visit these links
Jake Wharton’s Paper on Kotlin
My Blog ;)
Short Summary : Kotlin is an awesometacular alternative to Java, that works amazingly well on Android. And oh, it's developed by JetBrains!
P.S. There are no semicolons in Kotlin. *_*
Rx: The Concept
If you already have a good concept of Rx, then you can skip this topic. Otherwise... read on!
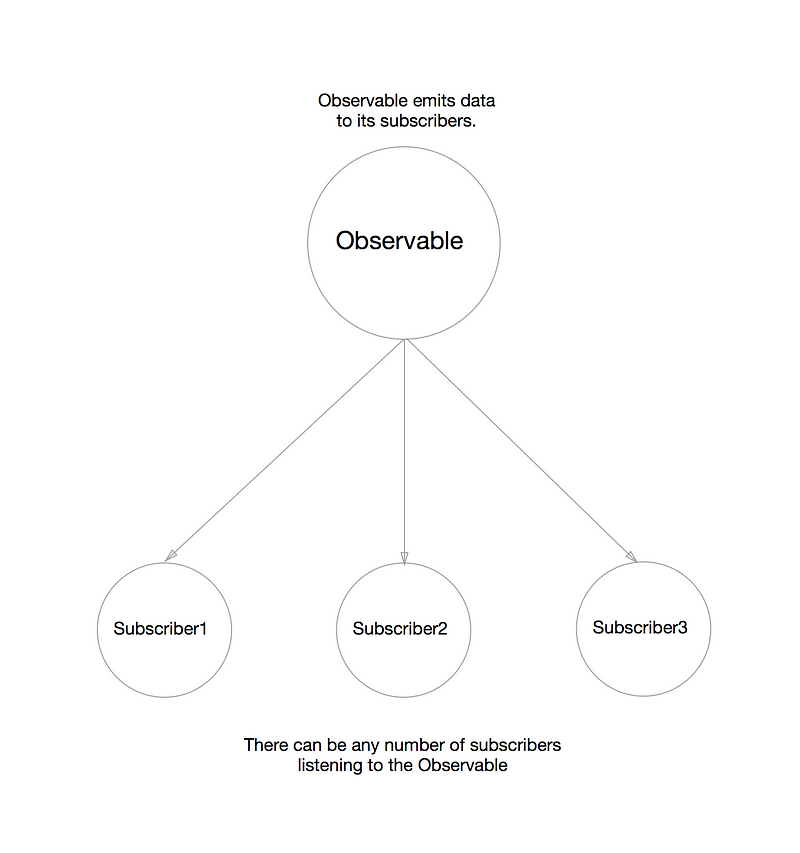
Ok so what is Rx? Well... It’s “reactive programming”... Reactive programming is, in easy words, a programming pattern closely related to the Observer Pattern. In which, Subscribers “react” to the events emmited by the Observable(s).
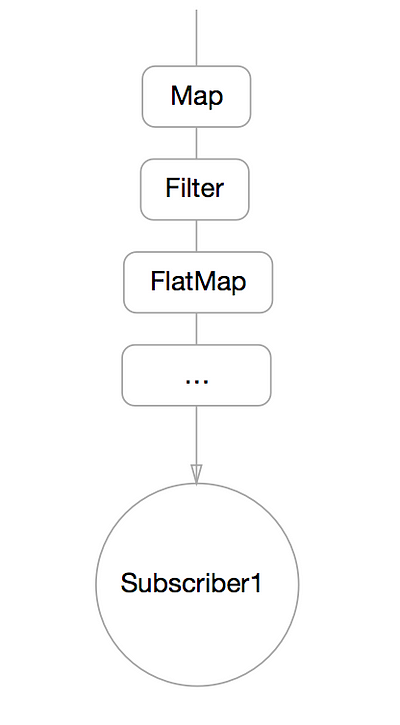
Transformations as the subscriber receives data from observable.
Rx is also a subset of Functional Programming. Hence often referred to as Functional Reactive Programming. Because... As the subscribers receive data, they can apply a sequence of transformations on them. (Similar to what we can do with Streams in Java 8)
We can even combine/merge different streams too. It’s that flexible! So... For now, just remember there are tons of different things we can do with the data we (the subscribers) receive from observables, on the fly!
Now that the concept is somewhat clear, lets come back to RxJava.
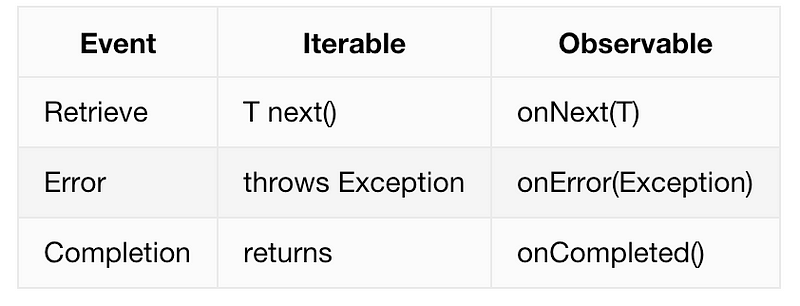
In Rx, the subscriber implements three methods to interact with observable
- onNext(Data) : Receives the data from Observable
- onError(Exception) : Gets called if an exception is thrown
- onCompleted() : Gets called when the data stream ends
This can be compared to the Iterables in Java. The difference is that iterables are pull-based, and Rx observables are push-based as the Observable pushes out data to its subscribers. Here’s the comparison table...
Another thing to note is that Rx is asynchronous in nature, meaning subscribers aren’t going to be waiting for other subscribers to finish. They’ll “asynchronously” process the streams.
So... Observables push out streams of data to their subscribers, and subscribers can consume those streams (with the help of the methods listed above). We can understand “streams” a bit better with the help of Marble Diagrams...
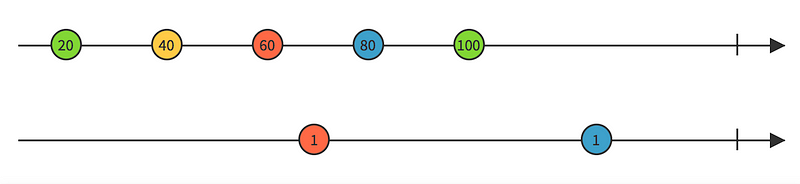
A marble diagram representing two different streams.
The cirlces on these streams represent data objects. And the arrows represent that the data is flowing in one direction (not referring to the boy band), in an orderly fashion! Have a look at this marble diagram...
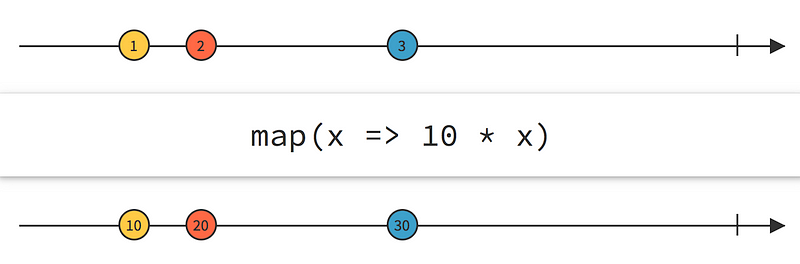
A mapping of a stream.
Like I mentioned before, we can transform the data (as well as streams) using operators like map, filter, zip etc. The image above represents a simple mapping. So after this transformation, the subscriber to this stream will get the transformed version of the stream. Cool, right?
I think you should now have a good concept of how things work in Rx, so lets get to the actual implementation.

Implementing Observables
The first thing we have to do is meditate.

After that, creating an Observable is not that difficult.
There are a number of ways we can create observables, I’ll list down just three here.
- Observable.from() : Creates an observable from an Iterable, a Future, or an Array.
//Kotlin
Observable.from(listOf(1, 2, 3, 4, 5))
//Java
Observable.from(Arrays.asList(1, 2, 3, 4, 5));

//It will emit these numbers in order : 1 - 2 - 3 - 4 - 5
//Which should be pretty obvious I guess.
- Observable.just() : Creates observable from an object or several objects
Observable.just("Hello World!")
//this will emit "Hello World!" to all its subscribers
- Observable.create() : Creates an Observable from scratch by means of a function. We just implement the OnSubscribe interface and tell the observable what it should send to its subscriber(s).
//Kotlin
Observable.create(object : Observable.OnSubscribe<Int> {
    override fun call(subscriber: Subscriber<in Int>) {
        for(i in 1 .. 5)
            subscriber.onNext(i)

        subscriber.onCompleted()
    }
})
And the java version of the same code...
//Java
Observable.create(new Observable.OnSubscribe<Integer>() {
    @Override
    public void call(final Subscriber<? super Integer>
subscriber) {
        for (int i = 1; i <= 5; i++)
            subscriber.onNext(i);

        subscriber.onCompleted();
    }
});

//Using the implementation above, we're telling the observer what //it should do when a subscriber subscribes to it. Hence the name //"onSubscribe".
The code I’ve written above is equivalent to the example I wrote for Observable.from() but as you can see, we have full control as to what should be emitted and when should the stream end. I can also send caught exceptions with the use of subscriber.onError(e).
Now we need subscribers!
Implementing Subscribers
After we have implemented our Observables... All we need is a subscriber! For Android, to subscribe to an observable, we first tell the observable about the threads on which we’re going to be subscribing and observing. RxAndroid gives us Schedulers, through which we can specify the threads. So lets take a simple “Hello World” observable for example in which I want the subscription to be done on a worker thread, and observation on the main thread.
//Kotlin
Observable.just("Hello World")
          .subscribeOn(Schedulers.newThread())
          //each subscription is going to be on a new thread.
          .observeOn(AndroidSchedulers.mainThread()))
          //observation on the main thread
          //Now our subscriber!
          .subscribe(object:Subscriber<String>(){
            override fun onCompleted() {
             //Completed
            }

            override fun onError(e: Throwable?) {
             //TODO : Handle error here
            }

            override fun onNext(t: String?) {
             Log.e("Output",t);
            }
           })
//Java
Observable.just("Hello World")
        .subscribeOn(Schedulers.newThread())
        .observeOn(AndroidSchedulers.mainThread())
        .subscribe(new Subscriber<String>() {
            @Override
            public void onCompleted() {
                //Completion
            }

            @Override
            public void onError(final Throwable e) {
                //TODO : Handle error here
            }

            @Override
            public void onNext(final String s) {
                Log.e("Output",s);
            }
        });

//You can get more info about schedulers and threading here.
So... What does it do?
When you run this code — It’ll display a log message
Output: Hello World!
And that’s it! This is how simple “subscription” is... You can get more details about subscribe here.
A Practical Example : Debounce!
Ok by now... You know how to create simple observables, right? So let’s do one of my favorite RxExamples... I want to implement this :
In this example, I enter text into an EditText and against this text, a response is triggered automatically —in which I print out the text. Now the response could be a call to an API. So if I trigger this call for every character I enter — that would be a waste because I only need the last one, meaning it should trigger a call only when I stop typing — let’s say after 1 second of typing-inactivity.
So how do we do this in non-reactive programming?
Well it ain’t pretty!
Non-Reactive Solution
I use a Timer, and schedule it to call run() method after a 1000 milliseconds delay in afterTextChanged() method. Oh and don’t forget to add runOnUiThread() in there as well. -_-
Conceptually it’s not that difficult but the code becomes very cluttered, even more so in Java!
Java version
//Java
Timer timer = new Timer();

final TextView textView = (TextView) findViewById(R.id.textView);
final EditText editText = (EditText) findViewById(R.id.editText);

editText.addTextChangedListener(new TextWatcher() {
    @Override
    public void beforeTextChanged(CharSequence s, int start, int count,
                                  int after) {
    }

    @Override
    public void onTextChanged(final CharSequence s, int start, int before,
                              int count) {
        if (timer != null)
            timer.cancel();
    }

    @Override
    public void afterTextChanged(final Editable s) {
        timer = new Timer();
        timer.schedule(new TimerTask() {
            @Override
            public void run() {
                runOnUiThread(new Runnable() {
                    @Override
                    public void run() {
                        textView.setText("Output : " + editText.getText());
                    }
                });
            }

        }, 1000);
    }
});
Kotlin
//Kotlin
var timer: Timer? = Timer()

val editTextStop = findViewById(R.id.editText) as EditText
editTextStop.addTextChangedListener(object : TextWatcher {
    override fun beforeTextChanged(s: CharSequence, start: Int, count: Int, after: Int) = Unit

    override fun onTextChanged(s: CharSequence, start: Int, before: Int, count: Int) {
            timer?.cancel()
    }

    override fun afterTextChanged(s: Editable) {
        timer = Timer()
        timer!!.schedule(object : TimerTask() {
            override fun run() {
                runOnUiThread { textView.setText("Output : " + editTextStop.getText()) }
            }
        }, 1000)
    }
})
Reactive Solution
Reactive solution is very boilerplate-free. And there are only 3 steps to it.
- Create an observable
- Add Debounce operator with 1000 Milliseconds (1 second) delay
- Subscribe to it
First the Java code
   Observable.create(new Observable.OnSubscribe<String>() {
                    @Override
                    public void call(final Subscriber<? super String> subscriber) {
                        editText.addTextChangedListener(new TextWatcher() {
                            @Override
                            public void beforeTextChanged(final CharSequence s, final int start, final int count, final int after) {
                            }

                            @Override
                            public void onTextChanged(final CharSequence s, final int start, final int before, final int count) {
                                subscriber.onNext(s.toString());
                            }

                            @Override
                            public void afterTextChanged(final Editable s) {
                            }
                        });
                    }
                })
                .debounce(1000, TimeUnit.MILLISECONDS)
                .observeOn(AndroidSchedulers.mainThread())
                .subscribe(new Action1<String>() {
                    @Override
                    public void call(final String s) {
                        textView.setText("Output : " + s);
                    }
                });
Now Kotlin ❤
        Observable.create(Observable.OnSubscribe<String> { subscriber ->
            editText.addTextChangedListener(object : TextWatcher {
                override fun afterTextChanged(s: Editable?) = Unit

                override fun beforeTextChanged(s: CharSequence?, start: Int, count: Int, after: Int) = Unit

                override fun onTextChanged(s: CharSequence, start: Int, before: Int, count: Int)
                        = subscriber.onNext(s.toString())
            })
        }).debounce(1000, TimeUnit.MILLISECONDS)
                .observeOn(AndroidSchedulers.mainThread())
                .subscribe({
                    text ->
                    textView.text = "Output : " + text
                })
Even Less Boilerplate →RxBindings!
Now for almost no boilerplate, we can use RxBindingswhich has many super-awesome bindings for UI widgets. And it works on both Java and Kotlin! Using bindings, the code becomes...
    //Java with Retrolambda and RxBinding
    RxTextView.afterTextChangeEvents(editText)
              .debounce(1000,TimeUnit.MILLISECONDS)
              .observeOn(AndroidSchedulers.mainThread())
              .subscribe(tvChangeEvent -> {
                 textView.setText("Output : " + tvChangeEvent.view()
                            .getText());
              });
    //Kotlin with RxBinding
    RxTextView.afterTextChangeEvents(editText)
              .debounce(1000, TimeUnit.MILLISECONDS)
              .observeOn(AndroidSchedulers.mainThread())
              .subscribe { tvChangeEvent ->
                        textView.text = "Output : " + tvChangeEvent.view().text
              }
As you would’ve noticed, there’s very little boilerplate and the code is much more to-the-point. If I were to go back to this code in a few months, it would hardly take me a minute to figure out what’s going on. And that is... Priceless!
Here are some awesome resources for Rx that I recommend. Do check these out! I will further play around with Rx+(Kotlin & Java) and complete part 2, so stay tuned and happy coding!
- Official Rx Page
- Grokking RxJava Series by Dan Lew
- Android Rx, and Kotlin : A case study
- Replace AsyncTasks with Rx
- PhilosophicalHacker Blog on Rx
- Implementing EventBus in Rx
- RxKotlin