Writing a RESTful backend using Kotlin and Spring Boot
Dimitar KotevskiWriting a RESTful backend using Kotlin and Spring Boot
Being here, I guess you already have an idea what a RESTful backend is and at least have heard of Kotlin and Spring [Boot]. Beside that you will also need to know what is Gradle and download IntelliJ IDEA. If not — click those few links and find out more before continuing.
At the end of this tutorial you will have a running RESTful backend packed inside a Jar together with an embedded Tomcat web server.
I will start this tutorial by answering the two questions that may be on your mind:
Why Kotlin?
Because I’m in love with Kotlin. And also because Kotlin (Java) has a great ecosystem and a huge community.
Why Spring Boot?
Because Spring is a great [web] framework and the Boot part of Spring Boot makes it even better. With Spring Boot things just work. No need to write dreadful configurations. You can, but you don’t need to (at least in our case). You just include it as a dependency, annotate a class or two and you are good to go.
We will create a very simple library management system. The system will be able to list all books available. It will allow us to add new books. For simplicity we will have all the data in memory and won’t use any databases.
Let’s start by creating the project. First open your IDE (preferably IntelliJ IDEA, because it has great support for Kotlin) and create a new Gradle project. In the same window, select Kotlin as a framework.
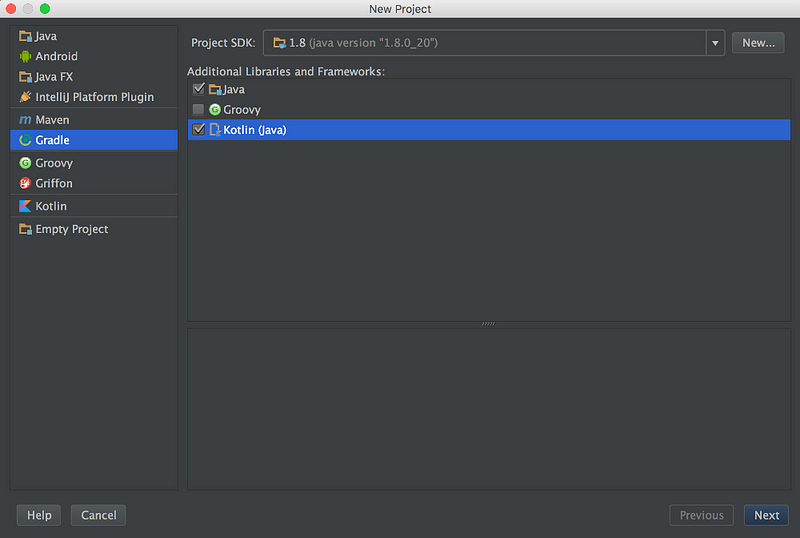 "New project" window
On the next screen you need to choose an ArtifactID and GroupID for your project. Those two things are the identification of your project in the Gradle world. Most often those IDs are the Java package of your application. In this tutorial I’ll use si.dime.kotlin.tutorials.rest.booklibrary as the main Java package and si.dime.kotlin.tutorials.rest as GroupID and booklibrary as ArtifactID. After hitting the Finish button you should have the project opened in your IDE.
NOTE: At the time of writing this tutorial, the IntelliJ IDEA CE 15.0.4 has a bug, which generates a broken build.gradle file. The content of the correct file is:
group 'si.dime.kotlin.tutorials.rest'
version '1.0-SNAPSHOT'

buildscript {
    ext.kotlin_version = '1.0.0'

    repositories {
        mavenCentral()
    }
    dependencies {
        classpath "org.jetbrains.kotlin:kotlin-gradle-plugin:$kotlin_version"
    }
}

apply plugin: 'java'
apply plugin: 'kotlin'

sourceCompatibility = 1.8

repositories {
    mavenCentral()
}

sourceSets {
    main.java.srcDirs += 'src/main/kotlin'
}

dependencies {
    compile "org.jetbrains.kotlin:kotlin-stdlib:$kotlin_version"
}
We will start with the good old HelloWorld app just so you can see how incredibly simple is to get a Spring Boot application up-and-running.
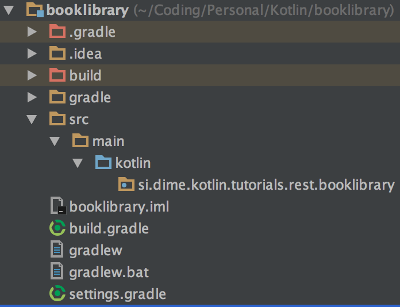 The project’s directory structure
First create the needed directory structure for your source files. Inside the project directory create the src/main/kotlin directories. You can do that directly from IDEA by right clicking on your project’s root directory and selecting New → Directory. After that create your base Java package by right clicking New → Package on the kotlin directory. Your project structure should something like the one on the left.
Let’s finally write some code. Create your main Application class by right clicking on your package and selecting New → Kotlin File/Class. Name your file App and click Ok. Inside the file we’ll write the main function:
fun main(args: Array<String>) {
    println("Hello Kotlin!")
}
We are ready to run our HelloWorld app. Right click inside the editor and click Run ‘YOUR_PACKAGE_NAME’.
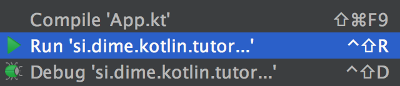
Running the application from IntelliJ IDEA
After clicking on Run, on the bottom of your screen you should get
Hello Kotlin!

Process finished with exit code 0
Now the fun part begins. We have our HelloWorld application in Kotlin and it’s time to “convert” it to a Spring Boot application. It’s amazingly easy.
First we will add the Spring Boot dependency to our project. At this point you should know that Gradle is a build system and that it has great dependency management. Adding dependencies is simple as adding a line in your build.gradle file. For SpringBoot we’ll need a few lines in our build.gradle file (not settings.gradle).
group 'si.dime.kotlin.tutorials.rest'
version '1.0-SNAPSHOT'

buildscript {
    ext.kotlin_version = '1.0.0'

    repositories {
        mavenCentral()
    }
    dependencies {
        classpath("org.springframework.boot:spring-boot-gradle-plugin:1.2.6.RELEASE")
        classpath "org.jetbrains.kotlin:kotlin-gradle-plugin:$kotlin_version"
    }
}

apply plugin: 'java'
apply plugin: 'kotlin'
apply plugin: 'spring-boot'

sourceCompatibility = 1.8

repositories {
    mavenCentral()
}

sourceSets {
    main.java.srcDirs += 'src/main/kotlin'
}

dependencies {
    compile "org.jetbrains.kotlin:kotlin-stdlib:$kotlin_version"
    compile("org.springframework.boot:spring-boot-starter-web:1.3.3.RELEASE")
}
After adding the dependency we need to refresh our Gradle configuration. To do that click on the Refresh button on the Gradle tool window. (The Gradle tool window can be activated from the main menu View → Tool windows → Gradle.
 The Gradle Tool Window
Now we are ready to write the application’s main class. Open the App.kt file and define the App class. The class needs to be open because Spring needs its configuration classes open (not final). And annotate the class with the @SpringBootApplication annotation
@SpringBootApplication
open class App {
}
The final thing to do is change our main method. Replace the println() line with:
SpringApplication.run(App::class.java, *args)
The line above boots Spring and starts everything (including the embedded web server). Your App.kt file should look like this:
@SpringBootApplication
open class App {
}

fun main(args: Array<String>) {
    SpringApplication.run(App::class.java, *args)
}
When you run the application, you should see a lot of output in the console at the bottom of the screen. The last line should say that the application has been successfully started.
Started AppKt in 2.306 seconds (JVM running for 2.628)
And that’s it. It’s that easy to convert a simple HelloWorld application to a SpringBoot web application with an embedded web server. We already have our application running on our embedded Tomcat server. If you open your browser and type http://localhost:8080in the address bar, you will get a HTTP 404 page. That’s because our application doesn’t know how to do anything.
Just for fun we’ll write a simple controller that prints Hello SpringBoot. Create a new Kotlin class and name it HelloSpringBootController. Annotate that class with @RestController. This annotation tells Spring that this class is a REST controller and knows how to handle web requests. The next thing to do is to write the actual method that prints the Hello SpringBoot line.
@RequestMapping(value = "/")
fun helloSpringBoot() = "Hello SpringBoot"
The method just returns the “Hello SpringBoot” string. The @RequestMapping annotation registers this method as a request handler and maps it to the **“/” **url. Your class should look like this:
@RestController
class HelloSpringBootController {

    @RequestMapping(value = "/")
    fun helloSpringBoot() = "Hello SpringBoot"
}
After restarting the application and refreshing your browser, you should see “Hello SpringBoot” in your browser.
At this point you can safely remove the HelloSpringBootController because we won’t be using it anymore.
We’ll start coding our book library system with the class that represents a Book. Create a new Kotlin file and name it Book.
class Book() {
    lateinit var ISBN: String
    lateinit var title: String
    lateinit var author: String
    var coverURL: String? = null

    constructor(
       ISBN: String,
       title: String,
       author: String,
       coverURL: String? = null): this() {

          this.ISBN = ISBN
          this.title = title
          this.author = @author
          this.coverURL = coverURL
    }
}
It’s pretty self-explanatory. It defines that every Book will have a required ISBN, a required title, a required author and an optional cover URL.
Because we’ll have all of our data in-memory, we’ll need something that’ll act like a database. For that purpose we’ll create a spring’s component. A component in Spring is an object which its lifecycle is managed by Spring. Additionally these components can be injected/autowired into class properties using Spring’s Dependency Injection system.
We’ll create our BooksDatabase component by creating a new Kotlin file and defining the following class:
@Component
class BooksDatabase {

    // All of our books will live here
    private val books = mutableListOf<Book>()
}
Because our data will live only in-memory, and the data won’t be persisted, we’ll need to somehow manually fill our list of books every time the application starts. Here comes in handy the @PostConstruct Spring annotation. This annotation tells to Spring that it needs to call this method right after it creates its instance and because our BooksDatabase component is a singleton (all of @Component annotated classes are singletons) we will “fill” our database just once, at application startup. So we need to write a method that fills our books list with initial data and annotates it with the @PostConstruct method.
@PostConstruct
private fun init() {

    // Fill our "database"
    books.add(Book(
     "0765326353",
     "The Way of Kings",
     "Brandon Sanderson",
     coverURL = "https://d.gr-assets.com/books/1448127430l/7235533.jpg"))

    books.add(Book(
     "0345391802",
     "The Hitchhiker's Guide to the Galaxy",
     "Douglas Adams",
     coverURL = "https://d.gr-assets.com/books/1327656754l/11.jpg"))

    books.add(Book(
     "076531178X",
     "Mistborn: The Final Empire",
     "Brandon Sanderson",
     coverURL = "https://d.gr-assets.com/books/1437254833l/68428.jpg"))
}
The next thing we need to do, are the methods for accessing the data from our database. We’ll need one for retrieving the data and one for inserting new items.
/**
 * Returns a list of all books
 */
fun getBooks() = books

/**
 * Adds the given book only if a book with
 * the same ISBN doesn't already exist.
 *
 * @return  true - if the book was successfully added
 *          false - otherwise
 */
fun addBook(book: Book): Boolean {
    books.firstOrNull { it.ISBN == book.ISBN }?.let {
        // A book with the same ISBN exist
        return false
    }

    // If we get to this line -
    // that means a book with the same ISBN
    // doesn't exist.
    books.add(book)
    return true
}
This completes our in-memory database. We can now move on to writing the REST Controller.
We will start in the same way we did with the HelloSpringBootController. Create a new Kotlin Class and name it BooksController. After that annotate it with the @RestController annotation**.**
@RestController
class BooksController {
}
In this controller we will be needing the “database” we created. In order to use it, we will need to inject/autowire the single instance of our BooksDatabase class.
@RestController
class BooksController {

    // Our books' database
    @Autowired
    private lateinit var database: BooksDatabase
}
Thanks to the @Autowired annotation and Spring’s DI, the database variable will point to the single instance of our BooksDatabase class. As in our database class we will need just two methods for accessing the data. The first will return a list of all the books and the second will add a new book to our database.
The first one is really simple:
@RequestMapping("", method = arrayOf(RequestMethod.GET))
fun books() = database.getBooks()
After this point we are able to test our backend in a browser. After starting the application you can open http://localhost:8080/ in a browser and you should get the list of books we have in our database in JSON format.
[
  {
    “title”: “The Way of Kings”,
    “author”: “Brandon Sanderson”,
    “coverURL”: “https://d.gr-assets.com/books/1448127430l/7235533.jpg",
    “isbn”: “0765326353”
  },

  {
    “title”: “The Hitchhiker’s Guide to the Galaxy”,
    “author”: “Douglas Adams”,
    “coverURL”: “https://d.gr-assets.com/books/1327656754l/11.jpg",
    “isbn”: “0345391802”
  },

  {
    “title”: “Mistborn: The Final Empire”,
    “author”: “Brandon Sanderson”,
    “coverURL”: “https://d.gr-assets.com/books/1437254833l/68428.jpg",
    “isbn”: “076531178X”
  }
]
As you can see, we don’t have to worry about the format of the output. Spring is clever enough to figure out that we are returning an object (or a list of objects) from our method and serialise that to JSON.
I guess you already figured it out that our application doesn’t allow duplicate books in our database. So we will need to find a way to inform the user when he tries to do that. According to the RESTfull specifications, when that happens, we will need to return the HTTP 409 — Conflict status back to the user. Luckily for us, Spring has a simple way of doing that.
First we will need to define an exception with a special Spring annotation, that defines the HTTP error code and later in our addBook method, we will just have to throw that exception in case the user tries to insert a duplicate item.
Let’s start with our exception. Create a new Kotlin class named DuplicateItemException:
@ResponseStatus(value = HttpStatus.CONFLICT, reason = "Duplicate item.")
class DuplicateItemException: RuntimeException() {}
Now we are ready to write our addBook method.
@RequestMapping("", method = arrayOf(RequestMethod.POST))
fun addBook(@RequestBody book: Book) =
     if (database.addBook(book)) book
     else throw DuplicateItemException()
We have the same situation as before. Spring will automatically convert our returned Book object to JSON or in the case of a duplicate item, it will return the 409 HTTP status. Also it will automatically convert the request body (thanks to the @RequestBody annotation) to an instance of our Book class.
For testing this method, I recommend you the POSTMAN chrome app.
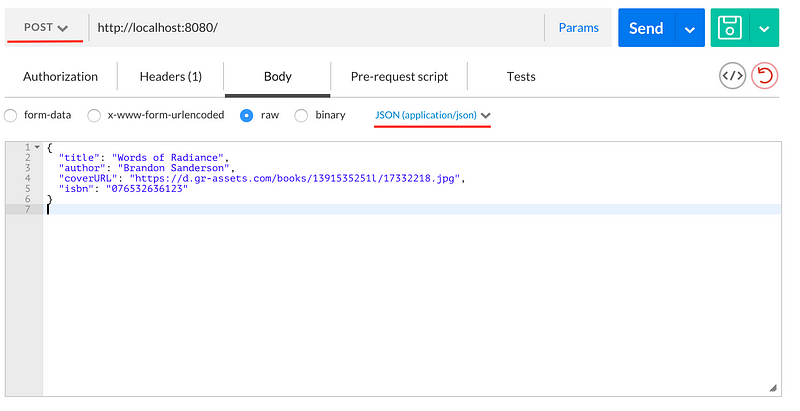
It’s important to set the HTTP method to POST, the content type to JSON and the body of the request. After hitting the Send button you should get the same book data in your response. In case you are trying to insert a duplicate item you should get an HTTP 409 status.
If you try to fetch the list of books after you added a new book, you should get the newly added book at the end of the list.
Now that we have all to code written, we want to be able to run our server independently of our IDE. This is also a no-brainer, thanks to Gradle. Just open your terminal and cd to the project’s directory. To build our project and create a runnable JAR with an embedded web server (Tomcat in our case) we will need to fire-up Gradle:
./gradlew clean bootRepackage
After the build has completed, our executable JAR will be located in build/libs. So to start our server we just need to start our JAR file:
java -jar build/libs/booklibrary-1.0-SNAPSHOT.jar
After a few seconds, you should see an output similar to:
Started AppKt in 2.207 seconds (JVM running for 2.532)
That’s it! We now have a fully functional RESTfull backend. In the near future I’ll try to write a couple of more tutorials that focus on writing an Android and iOS apps that use this backend.
Disclaimer
Yes, I’m a big Sanderson’s fan :)